
This guide serves as the driver's operating manual for the Cabman MDT taximeter. In this guide, you will find operating procedures for various situations and explanations for the taximeter's functions.
Starting and ending the shift #
Below you can find instructions on how to start and end a shift
Driver number and starting the shift #
A shift begins by logging into the taximeter with your driver ID by tapping the login button in the top-right corner of the home screen.
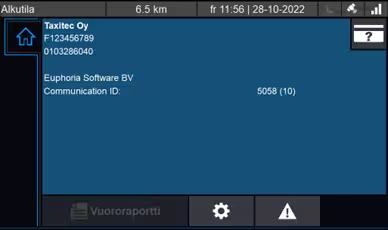
Driver number is used to login to the meter. Driver number is created in Cabman Data portal (www.cabmandata.com).
Driver ID is used to identify the driver in the reports, and it is crucial that all drivers use their own driver ID

If your company has PIN code verification enabled, the meter will prompt for the PIN code after entering the driver ID. The PIN code is also configured on the Drivers tab in Cabman Data.
The driver number and PIN code are defined in the "Host Company's" Cabman Data. For example, in the case of Taksi Helsinki, the driver must be created by the "Host Company" (i.e., Taksi Helsinki). If your company does not use PIN code verification, driver details can also be created directly in your own Cabman Data.
Ending the shift and shift report #
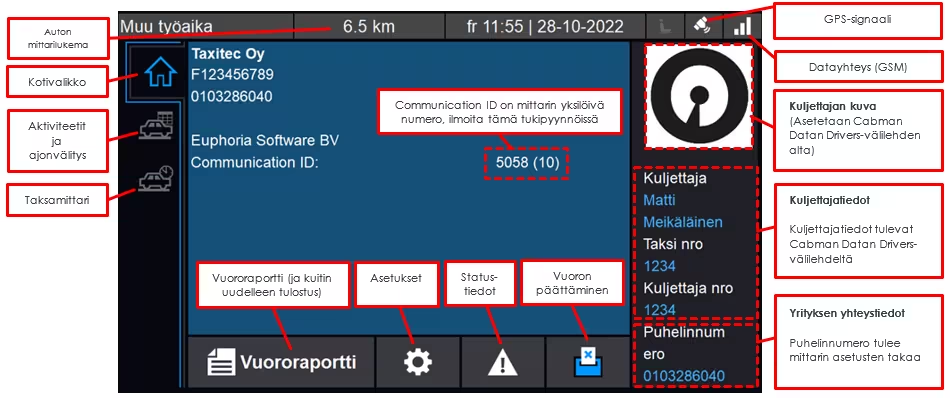
A shift is ended from the Home menu by tapping the "End shift" button, check Image 3. Home screen.
Vuoron lopetuksen jälkeen mittarilta saadaan tulostettua vuororaportti, jossa näkyy kyseisen vuoron osalta ajetut matkat, kokonaissummat maksutavoittain ja ALV-erittely.
Note: Shifts must be kept to a maximum length of 24 hours, so always log out whenever you finish your driving shift. Excessively long shifts can cause reporting errors, especially when they stretch across multiple days.
Home screen #
Once you log into the meter with your driver ID, you reach the home screen, where the details entered in Cabman Data—essentially matching your driver card information—are displayed on the right.
The navigation panel on the left allows you to move between different tabs, including the taximeter, activities, and navigation.
At the bottom of the Home menu, you can view shift details and reprint receipts, among other options. In the bottom-right corner, you can end your shift.
Settings menu #
From the settings tab you can change the language, adjust display brightness and adjust the volume.
Status menu #
From the Status menu you can see for example the data connectivity and GPS status and other relevant information in regards to meters functions.
Viewing trips and reprinting receipts #
You can view the trips and activities of a shift from the "Shift report" (Vuororaportti) button in the meter's Home menu. In addition, receipt copies and more detailed information on all completed shifts can be found in the Cabman Data portal.
How to reprint receipt from the meter #
You can reprint receips from the same shift using the "Shift report" (Vuororaportti) button and following the steps detailed below:
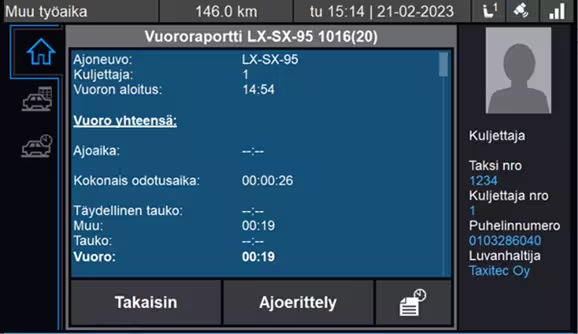
Under the "Shift report" button, select "Trip breakdown" (Ajoerittely).
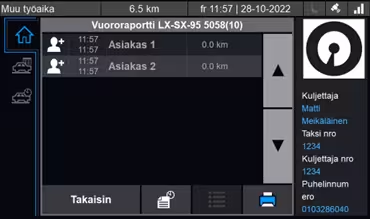
From the "Trip breakdown" tab, select the desired trip you want a receipt for and tap the list icon. This opens the detailed information for that specific trip, where you will find the option to print a receipt copy.
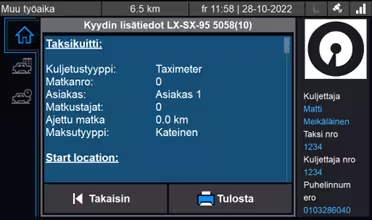
Checking the vehicletype #
You can check the vehicle type (e.g., passenger car or minivan) by tapping the gear icon in the Home menu, followed by the gear info icon. In the System Info menu, scroll down to the "Activation settings" section, where the "Vehicletype" field indicates the vehicle type currently set for the meter.
Tariff menu and starting the trip #
From the Tariff menu, you can view the tariffs programmed into the meter. You can navigate up and down the Tariff menu using the side buttons. The selected tariff is highlighted in blue, and you confirm your selection by pressing the blue "Start" (Aloita) button.
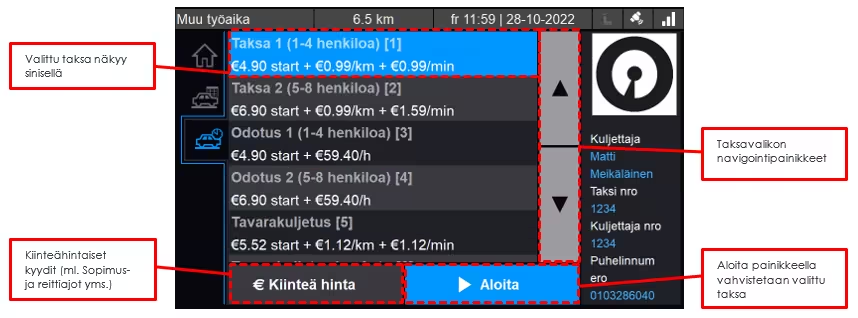
Order ID #
Tariffs can be configured with a mandatory order ID, which is entered when starting or ending a trip, depending on the company and the selected tariff. Entering this ID is crucial, especially for trips billed as corporate invoices.
The order ID is transmitted forward through the interface and is used to allocate and match invoices correctly.
Tariff view #
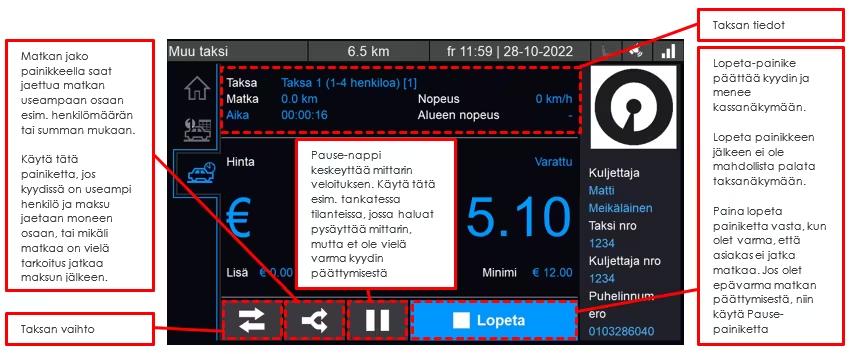
In the tariff view, the meter measures both distance and time. From this screen, you can see the active tariff, distance driven in kilometers, elapsed time, and the speed measured by the taximeter.
From the tariff view, you can switch between predefined tariffs, split the trip into parts, temporarily pause billing, or end the trip entirely and proceed to the checkout view.
Cash registry and payment types #
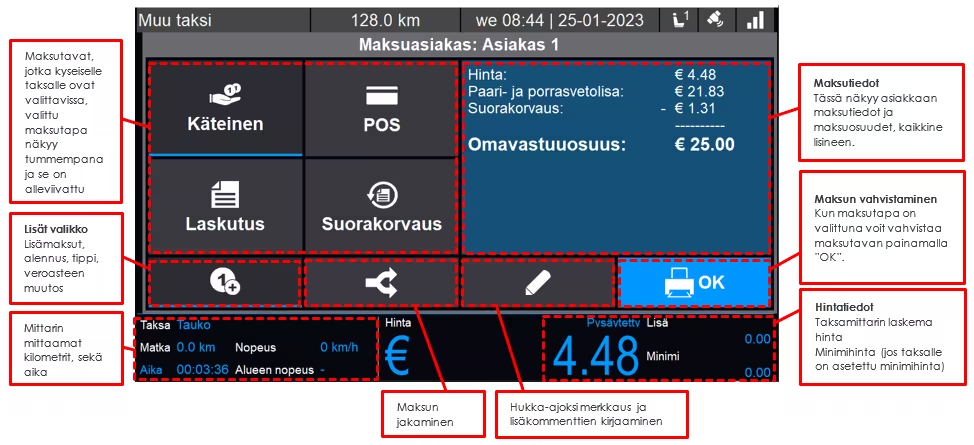
When the trip is ended, you always enter the checkout view. In the checkout view, you select the payment method for the customer, add extra charges, apply discounts, adjust the VAT rate, and enter tips.
In the checkout view, you can also log the transaction as a deadhead run, add comments for billing purposes, and split payments.
Payment types #
Cash #
To log a trip as a cash payment, select "Cash" (Käteinen) and press "OK".
Card payment #
For card payments, the procedure depends on the payment terminal used and whether it has been paired. The steps for each option are detailed below:
myPOS Go 2 (paired) #
Select "Card payment" (Korttimaksu) in the checkout view. The meter will prompt you to press the green button on the myPOS Go payment terminal. When you press the green button on the paired myPOS device, the terminal checks for any pending transactions on the meter and transfers the sum directly to the terminal.
If a customer uses a debit or credit card that relies solely on a magnetic stripe, swipe it through the magnetic stripe reader located at the top of the myPOS Go display.
NETS V3M2 #
Press "Card payment" (Korttimaksu) in the checkout view, and the transaction sum will automatically transfer from the meter to the terminal.
Verifone V400m #
Tap the "POS" button to transfer the amount directly from the taximeter to the terminal. Once the transaction completes, confirmation is sent back to the meter.
Note: The Verifone V400m requires an active "ECR" connection to communicate with the meter. If the terminal displays "ECR connection lost" (ECR-yhteys poikki), tap the data connection bar in the top-right corner of the terminal screen to reconnect. If issues persist, verify that both cables (Micro-USB data cable and power cable) are securely plugged into the terminal's dock. You can also configure the Verifone settings to check the ECR connection automatically (e.g., every 15 seconds).
Unpaired payment terminal #
If your company does not use a myPOS terminal or the terminal is not paired, the "Card payment" button functions like a cash transaction entry. A system configuration disabling the terminal integration must be ordered for the meter. This allows payments to be recorded as card transactions for reporting purposes, but the amount must be entered manually into the terminal.
Invoicing #
Selecting the Invoicing (Laskutus) payment method opens a menu with several options, which are detailed below.
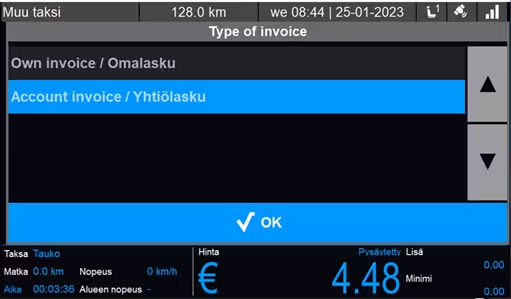
Own invoice #
Own invoice (Omalaskutus) means that your company invoices these trips directly. If you handle your own invoicing, we recommend entering an invoice identifier into the "Note" (Huomautus) field. The Note option is located in the checkout menu under the pencil icon.
This ensures that the note is logged alongside the transaction in both the Payment Report downloaded from Cabman Data and the detailed shift data field on the Shifts tab, making invoicing simpler.
Company invoice #
Company invoicing (Yhtiölaskutus) means that invoicing is handled by an entity other than your own company. This applies to any trip where you do not issue the invoice yourself, but where the invoice is generated automatically through dispatch software or a similar system.
Other invoicing methods #
Additional invoicing methods can also be configured on the meter if you need to separate multiple invoicing categories for easier tracking. These function in the same way as other invoicing types.
Taxi cards and other industry cards #
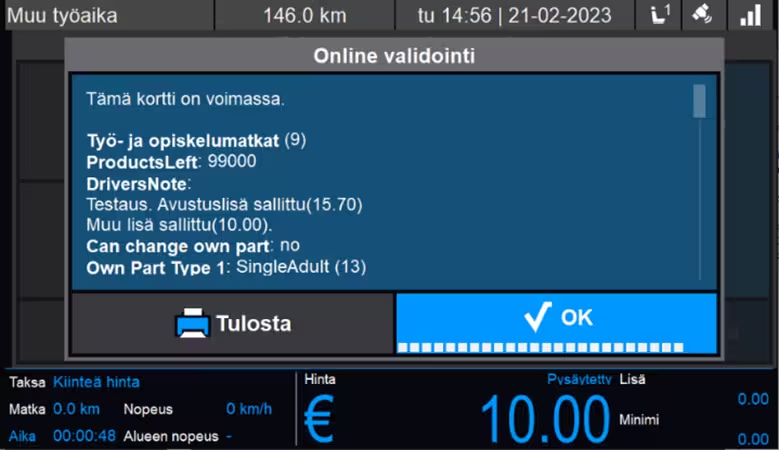
To pay with a taxi card, swipe the card through the dedicated magnetic stripe reader in the checkout view (do not use the stripe reader on the payment terminal). You do not need to select a payment method in the checkout view beforehand—simply swipe the card through the reader once the trip ends.
If taxi cards are enabled for your company and you have an agreement with the card issuer, the meter checks upon swiping whether the card is valid, has sufficient funds, and whether your company is authorized to accept payments with it.
If these conditions are met and the meter accepts the card, confirmation is displayed on the screen and a receipt is printed. If the card carries a co-payment liability (omavastuu), that amount will also be shown.
For cards other than single-use cards, you can verify card validity and any potential co-payment portion during the trip by swiping the card through the magnetic stripe reader while en route.
The card number used is recorded and visible in the Payment Report downloaded from Cabman Data.
For MPK cards (MPK-kortti), the driver must always select the trip type (e.g., work, personal errands, etc.). The card must also have a remaining balance to be accepted.
Alternative card payment #
The "Alternative card payment" (Muu korttimaksu) payment method can be used when a transaction is paid by card without using an integrated payment terminal—for instance, when using a myPOS Payment Tag, a second unpaired terminal, MobilePay, or a similar alternative. This option can also be used if a connection error prevents a paired myPOS terminal from confirming a successful payment to the meter.
To use this payment method, tap the pencil icon in the checkout view and select "Alternative card payment" (Muu korttimaksu).
Surcharges and extras #
In the checkout view, you can set and adjust extra charges, discounts, tips, and log trips as deadhead runs (hukka-ajo). These options vary depending on the active tariff, meaning different tariffs may feature different extra charge options in the menu. Currently, extra charges are always applied after the trip has ended. Extra charges are added by selecting options from the "Surcharges" (Lisät) menu.
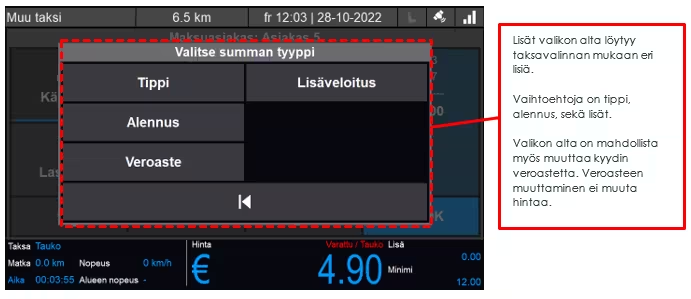
Surcharges #
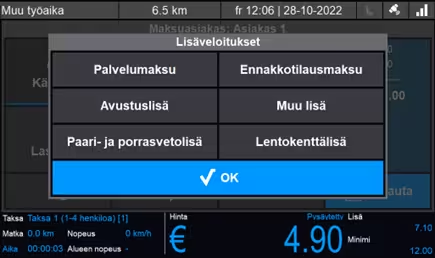
Under the Surcharges (Lisäveloitukset) menu, you will find the surcharges designated for the selected tariff. The names and prices of these extra charges can be customized per tariff. An open-ended extra charge—such as the "Other surcharge" (Muu lisä) shown in Figure 13—is also available, allowing you to enter the surcharge amount manually.
Discount #
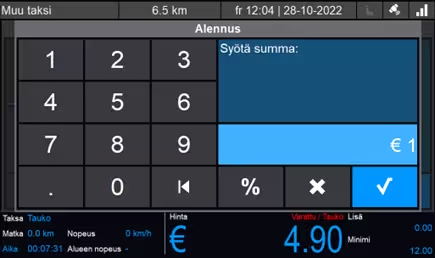
Discounts can be applied as either a fixed euro amount or a percentage. Tap the percentage button to switch the discount mode to percentage-based.
Note: The meter currently calculates percentage-based discounts exclusively on the base meter fare. If the trip includes extra charges and you wish to apply a discount to the total amount (including surcharges), the discount must be calculated and entered as a fixed euro sum.
Tip #
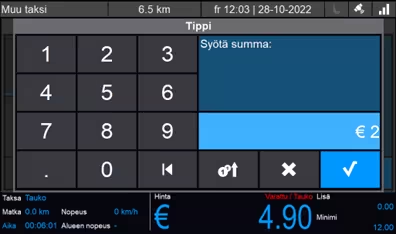
The tip option is located under the Extra Charges (Lisäveloitukset) menu, offering two ways to log the amount. The default is that you enter the total sum that customer will pay and the meter will calculate the exceeding amount as tip.
You can also change this to manually entered sum for the tip.
Changing the VAT rate #
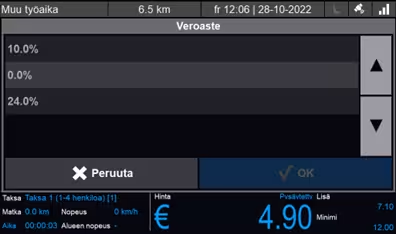
It is possible to change the VAT rate between the rates predefined for the specific tariff. Changing the VAT rate during payment checkout does not alter the total fare of the trip; instead, it adjusts the tax-exclusive amount (veroton summa). Specific VAT rates can also be set as default values for individual tariffs when ordering tariffs for the meter. The top VAT rate entry displays the standard rate configured for that tariff.
Not paid #
If a payment cannot be collected for a trip, or if you started a trip by mistake, you can log the trip as a "Not paid" (hukka-ajo). To do this, tap the pencil icon in the checkout view and select "Not paid" (Hukka-ajo).
Splitting payments #
There are two ways to split a payment depending on the scenario. If the fare is shared among multiple passengers or if the journey continues for remaining passengers after the first payment, the trip should be split before entering the checkout view (with the exception of KELA transport trips).
If a single customer wishes to pay the total fare using multiple payment methods, the payment split button in the checkout view is used instead.
Each split payment portion can have its own individual extra charges, discounts, or tips applied.
Splitting payments among multiple passengers (before checkout) #
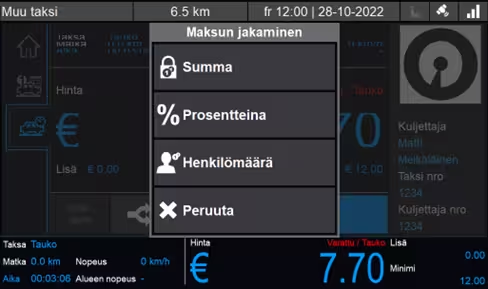
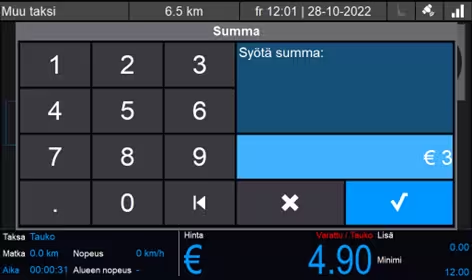
If multiple passengers are in the vehicle and wish to pay separately, or if a passenger leaves the cab while others continue the journey, use the payment split button located directly in the taximeter view (except on KELA trips). After selecting the split option, the meter provides three calculation methods (as shown in Figure 17):
- Sum – split by entering a specific euro amount. The entered amount is transferred to the checkout view. After payment is completed, the meter returns to the taximeter view, where you can either perform another split or proceed straight to checkout for the remaining balance.
- Percentage – split by entering a percentage of the total fare. The calculated amount is sent to checkout. Once paid, the meter returns to the taximeter view to process additional splits or conclude the trip.
- Passenger amount (PAX) – split equally based on the number of passengers. The meter divides the total fare by the entered passenger count and transfers the first portion to checkout. After processing, it returns to the taximeter view for subsequent payments.
By splitting the payment this way before checkout, individual extra charges, tips, and discounts can also be applied separately to each person's portion.
Splitting payments for a single passenger (In checkout view) #
If a single passenger wishes to cover the fare using multiple payment methods (for example, paying partially in cash and partially by card), the easiest method is using the payment split button directly within the checkout view.
When activated, the meter prompts for the portion of the total amount to be paid first. Once this partial sum is entered and paid, the meter automatically returns to the checkout view displaying the remaining balance adjusted for the previous payment.
Notes / remarks #
In the checkout view, you can record comments and notes that will appear in Cabman Data and shift reports. These notes are particularly useful for invoicing—for example, entering a specific company or personal billing identifier. This makes matching trips to the correct billing entity much simpler. The notes menu is accessed via the pencil icon.

Fixed price trips #
A fixed-price tariff option is pre-configured on every Cabman meter and can be found in the Tariff menu next to the "Start" (Aloita) button.
Fixed-price tariffs are typically used for contract and route transport. Detailed instructions for these can be found under section 12. Route and Contract Transport.
KELA trips #
Cabman meters support direct integration for KELA-subsidized medical transport trips. Currently, the Cabman meter is approved for KELA dispatch systems operated by Menevä and Taksi Helsinki. To enable KELA trips for either or both providers, contact the respective KELA dispatch company and notify support via email at helpdesk@titec.fi. helpdesk@titec.fi
Starting a KELA trip #
Select the appropriate KELA tariff from the meter's Tariff menu and tap "Start" (Aloita).
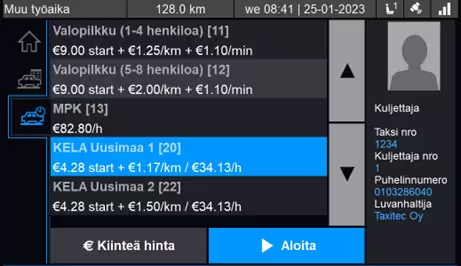
The meter will then prompt you to enter the KELA order ID (KELA-tilaustunnus). Enter the customer-specific order ID and press "OK". If the order ID is entered incorrectly, the trip cannot be started.

Once the order ID has been entered successfully, the meter switches to the KELA tariff. From this screen, you can perform the following core functions:

Add passengers: Register additional passengers for shared transport trips (yhdistelykyydit).
Switch to waiting tariff #
Jos KELA-kyyti on tarkoitus vaihtaa odotukselle, tapahtuu tämä kuvan 22. mukaisesti ”Taksan vaihto” painiketta painamalla.
Vaihto takaisin KELA-taksalle tapahtuu saman painikkeen alta.
Kela-kyydin lopettaminen ja kassatoiminnot #
KELA-kyytien lopettamisen jälkeen saavutaan kassanäkymään. Kela-toiminta logiikka eroaa hieman Menevän osalta muista välitysyhtiöistä. Alla eritelty toimintatavat.
Kela-kyydin lopettaminen #
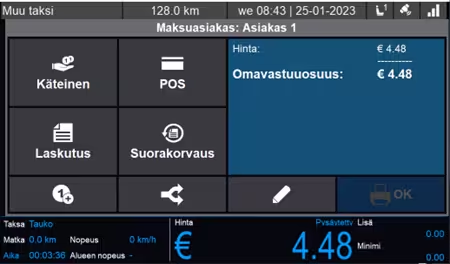
Kun KELA-kyyti lopetetaan, siirtyy mittari kassanäkymään (kuva 23). KELA-kyydin kassanäkymästä löytyy perus maksutapojen lisäksi ”Suorakorvaus”-painike.
Kela kassatoiminnot (ei Menevä) #
Taksamittarin toimintologiikka KELA-kyytien kassanäkymässä on seuraava, kun kyseessä on muun, kuin Menevän välittämä KELA-kyyti.
- Jos asiakkaan täytyy maksaa omavastuu, valitaan maksutavaksi käteinen, kortti tai laskutus. Jos summa on yli 25 €, jakaa mittari itse loput automaattisesti maksutavalle ”Suorakorvaus” ja tästä saa halutessaan myös kuitin.
- Mikäli asiakkaan omavastuukatto on täyttynyt, eikä asiakkaan tarvitse maksaa omavastuuta valitaan maksutavaksi ”Suorakorvaus”. Tällöin koko summa menee automaattisesti KELAlle suorakorvauksesi, mutta asiakas saa kuitenkin 0 € kuitin halutessaan.

Menevän Kela kassatoiminnot #
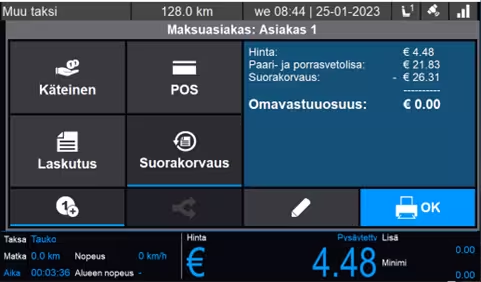
Taksamittarin toimintologiikka KELA-kyytien kassanäkymässä on Menevän KELA-kyydeissä seuraavanlainen, riippuen omavastuusta:
- Asiakas maksaa omavastuun ja kyydin summa on suurempi kuin 25 €
- Menevän KELA-kyydeissä otetaan aina ensin asiakkaan omavastuu osuus jaetun maksun kautta.
- Paina ”Jaettu maksu” painiketta ja syötä asiakkaan omavastuu 25 €. Valitse tämän jälkeen asiakkaan haluama maksutapa.
- Loppu osuus laskutetaan ”Suorakorvaus” painiketta painamalla.
- Asiakas maksaa omavastuun, mutta kyydin summa on pienempi kuin 25 €
- Mikäli asiakkaan on maksettava omavastuu, mutta kyydin kokonaishinta on alle 25 €, otetaan asiakkaalta maksu asiakkaan haluamalla maksutavalla.
- Suorakorvausosuudesta muodostuu automaattisesti nolla kuitti.
- Asiakas ei maksa omavastuuta
- Mikäli vuosiomavastuu on täyttynyt, valitaan maksutavaksi suoraan ”Suorakorvaus”.
- Asiakkaan osuudesta muodostuu nolla kuitti automaattisesti.
Asiakas maksaa KELA-kyydin omavastuuden osissa #
Mikäli asiakas haluaa maksaa KELA-kyydin omavastuuosuuden osissa, tehdään jaettu maksu ennen maksun hyväksymistä, maksun jakaminen painikkeella.
Mittari kysyy tämän jälkeen, että mikä on jaettavan maksun osuus. Kun tämä on syötetty, täytyy valita maksutapa (käteinen, korttimaksu, laskutus). Kun maksu on suoritettu palaa mittari kassanäkymään lopun omavastuuosuuden osalta ja tähän päästään valitsemaan myös maksutapa (käteinen, korttimaksu, laskutus). Jos suorakorvattavaa osuutta jää, tekee mittari samalla tavalla automaattisesti tapahtuman loppusumman mukaan.
Yhdistelykyydit #
Jos samaan KELA-kyytiin tulee useampi matkustaja, tapahtuu lisääminen kuvan 22. mukaisesti ”Lisää matkustaja” painiketta painamalla.
Tämän jälkeen mittari pyytää syöttämään seuraavan asiakkaan tilaustunnuksen ja jos se on syötetty oikein, palaa mittari kyytinäkymään. Vasemmalle ajonvälitysnäkymään tulee tällöin myös näkyviin kaksi asiakasta.
Huomioitavaa on, että toisen matkustajan lisäämisen yhteydessä mittari menee ”Pause”-tilaan, eikä taksa juokse. Kun matkustaja on otettu kyytiin, tulee siis muistaa jatkaa matkaa ”Play”-painiketta painamalla.
Kun KELA-kyyti halutaan päättää, painetaan ”Lopeta” painiketta kuvan 22. mukaisesti, jonka jälkeen mittari kysyy, että kumman asiakkaan osalta matka halutaan päättää.
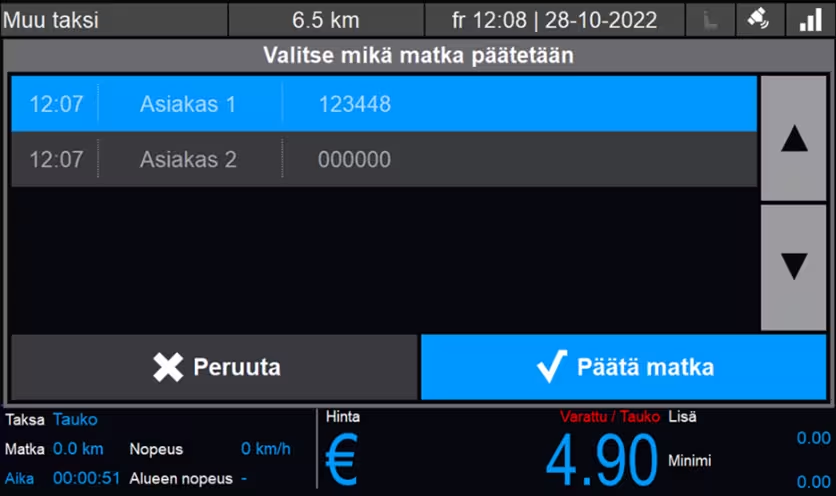
Kyydin lopettamisen vahvistamisen jälkeen mittari siirtyy kassanäkymään valitun asiakkaan osalta. Kun kassatapahtuma on hoidettu, palaa mittari takaisin ajonäkymään toisen asiakkaan osalta. Huomaa, että mittari menee automaattisesti ”Pause”-tilaan tässä vaiheessa, eikä taksa juokse ennen kuin painetaan ”Play”-painiketta.
Tavarakuljetukset #
Cabman mittarilla voidaan ajaa myös tavarakuljetuksia. Tavarakuljetuksissa arvonlisäveroprosentti on 25,5 %. Mikäli mittarissasi on erillinen tavarakuljetustaksa, voidaan tähän asettaa arvonlisäveroprosentti 25,5 % valmiiksi taksojen tilauksen yhteydessä.
Mikäli ajat pakettikuljetuksia henkilökuljetustaksalla, täytyy arvonlisäveroprosenttia muokata manuaalisesti kyydin päättymisen jälkeen (Huom! tällöin kyydin hinta ei muutu, vaan veroton summa muuttuu!).
Mikäli haluat oman tavarakuljetustaksan korkeammalla hinnalla, jossa otetaan huomioon arvonlisäveron muuttuminen. Tarkemmat ohjeet verokannan muuttamiseen löytyvät kohdasta 8.2.4. Veroasteen muuttaminen.
Reitti- ja sopimusajo #
Reitti- ja sopimusajot, joissa hinta muodostuu kuljettajan manuaalisen laskelman mukaan kyydin päätyttyä, voidaan hoitaa ”Kiinteähintaisella kyydillä”, josta tarkemmin kohdassa 9. Kiinteähintaiset kyydit.
Jos kyydillä ei ole aloitushintaa, aloitetaan kyyti syöttämällä 0 € kiinteähintaiseen kyytiin. Kyydin päätyttyä kassalle mentäessä näkyy ajetut kilometrit ja aika, jonka mukaan voi sopimusajoon laskea veloituksen ja syöttää tämän manuaalisesti lisämaksuna.
Aktiviteetit ja ajopäiväkirja #
Aktiviteettien avulla voidaan tarkemmin seurata ja analysoida taksitoimintaa, sekä helpottaa taksiyrityksen tiedonantovelvoitteen täyttämistä. Alla kuvaus mittarilla olevista aktiviteeteista ja niiden käyttötarkoituksesta:
- Tolpalla – Tolpalla aktiviteetilla voidaan kirjata helposti tolpalla vietetty aika
- Asiakashaku – Asiakashaku aktiviteettia voidaan käyttää, kun ollaan menossa noutamaan asiakasta, ilman että taksamittari on päällä. Tällöin myös kattovalo on sammuneena.
- Aloitus/lopetus – Aloitus/lopetus aktiviteettia käytetään vuoron aloituksen ja lopetuksen yhteydessä merkattaviin siirtymiin.
- Huoltoajo – Huoltoajoa käytetään auton huoltotoimiin liittyvissä ajoissa.
- Tankkaus/lataus – Tankkaus/lataus aktiviteettia käytetään tankkauksen ja sähköauton lataamisen yhteydessä.
- Tauko – Tauko aktiviteetilla merkitään kuljettajan pitämät tauot.
- Autonpesu – Autonpesu aktiviteetilla merkitään auton pesuun käytettävä aika.

Aktiviteetit valikko löytyy mittarin vasemmasta navigointivalikosta valitsemalla Aktiviteetit ja ajonvälitys välilehti. Tämän alta löytyy ikoni, jossa on kalenteri ja kello. Tämän valitsemalla pääset kuvan 27. näkymään. ”Lisää” painikkeen alta löytyy loput aktiviteetit.
Cabman Data portaalista näkyy myös auton viimeisin kilometrilukema, mikäli mittarille on asennuksen yhteydessä syötetty auton mittarilukema oikein.
Cabman Data portaalista voit katsoa rekisterinumerokohtaisesti tuottavan ammattiajon, tuottamattoman ammattiajon, sekä yksityisajon osuudet kilometreistä. Yksityisajosta lisää seuraavassa kohdassa.
Vuoron ulkopuoliset kilometrit ja yksityisajo #
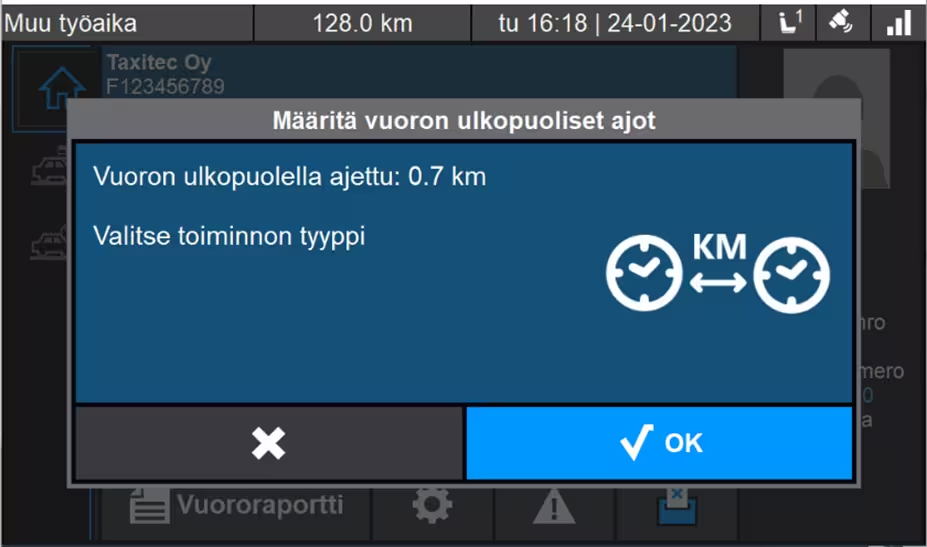
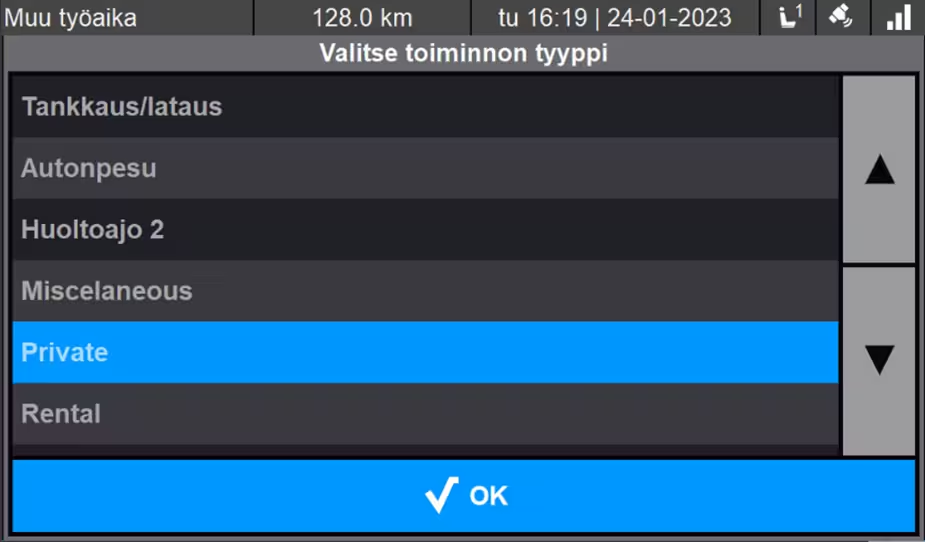
Mikäli autolla ajetaan siten, että vuoro ei ole päällä, pyytää mittari seuraavan kerran vuoroon kirjautumisen yhteydessä määrittämään vuoron ulkopuolella ajetuille kilometreille jokin selite.
Valittavissa on samat aktiviteetit kuin vuoron aikanakin, poikkeuksena yksityisajoaktiviteetti. Yksityisajon saa kirjattua ainoastaan vuoron ulkopuolisille kilometreille tästä valikosta.
Huomioitavaa #
- Mittarin ajovuorot tulee pitää maksimissaan vuorokauden mittaisena, sillä ylipitkät vuorot voivat aiheuttaa ongelmia raportoinnissa, etenkin jos vuoro venähtää useamman päivän mittaiseksi.
- Vuoro on mahdollista lopettaa ainoastaan pysähtyneenä.
- Mittariin on mahdollista lähettää päivitykset etänä ilmateitse (OTA). Päivitykset latautuvat taustalla, kun mittari on vuorossa. Kun päivitys on latautunut, asentuu se automaattisesti seuraavan uloskirjautumisen yhteydessä. Päivityksen latautumisessa kestää yleensä päivityksen koosta riippuen muutamasta minuutista muutamaan tuntiin. Myös taksat ja konfiguraatio on mahdollista päivittää etänä. MS20 ohjelmistoversiosta alkaen mittarilla näkyy myös ilmoitus siitä, kun mittariin lähetetty konfiguraatio tai ohjelmistopäivitys on ladattavissa.